
Writing an Arduino library for Pixel Dice
I wrote a library for connecting Pixel dice to the ESP32 mcu and published it for Arduino and PlatformIO.
After my previous project with the dice, I wanted to avoid relying on a phone keeping applications alive. Using a laptop or a RasPi seemed like the simplest path, but I realized that since ESP32 microcontrollers support BLE and WiFi, they could be a much smaller and cheaper option.
Code repo: https://github.com/axlan/arduino-pixels-dice
Searching the discord, someone had indeed posted a proof of concept: https://gist.github.com/JpEncausse/cb1dbcca156784ac1e0804243da8e481. The code was incomplete and when I did get it to work, it seemed to have some race conditions.
Seeing this triggered the strangest fear of missing out. I’ve rarely made any significant OpenSource contributions, and this seemed like something very much in my wheelhouse. Despite having pretty limited time to work on this, I wanted to bang out something I could share.
High Level Design
Getting Started with BLE
I came into this knowing nothing about BLE (Bluetooth low energy). Since this is the area I’m least familiar with, this section should be taken as even less authoritative then usual. Having the proof of concept here was a great jumping off point.
The actual library documentation is pretty bare bones: https://github.com/nkolban/esp32-snippets/blob/master/Documentation/BLE%20C%2B%2B%20Guide.pdf
For a much more complete guide on BLE I found fairly useful: https://developerhelp.microchip.com/xwiki/bin/view/applications/ble/introduction/
For my purpose I broke the process down into the following state machine:
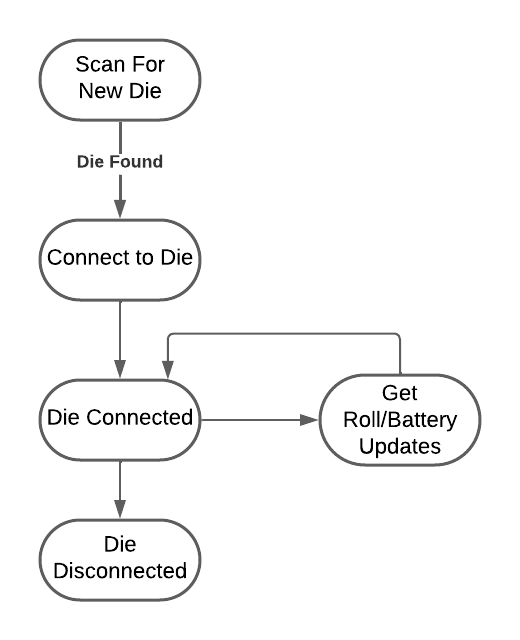
On startup, the system isn’t aware of any dice. Scans need to be run to detect the die’s periodic broadcasts of their presence. When a scan detects a die it gets its name and unique identifier along with the details needed to establish an ongoing connection.
By establishing a connection, the die can send out the updates that describe the rolls. The library can send commands to flash the LED’s.
The connection is lost the die goes out of range or turns off.
This is fairly straightforward to describe, but most of the nuance to me is in the threading model used by the BLE library. Since the scans take several seconds, typically you’d want to be able to have these run in the background. The library triggers a callback when a device is found, and callbacks are generated when a new message is received from a connected device. It took me some trial and error to understand which calls would deadlock, and which could run in parallel.
Designing the Library
To make the library as “Arduino-y” as possible. I wanted to hide all the BLE and multi-threading details. The other goal I had was to try to find a sweet spot with minimal for complexity while still making it fully featured.
The normal Arduino pattern is to have “setup” code that is run once at the start, and “loop” code that runs in an infinite loop. This doesn’t map nicely to the actual behavior of the BLE device, so I have the library do things asynchronously behind the scenes and expose the results to an interface that can be polled periodically in the “loop”.
The library consists of:
ScanForDice/StopScanning- To start and stop running scans for new dice in the background. By default found dice are automatically connected to. Otherwise they’re blacklisted by default untilConnectDieis called.ListDice- To get the dice that have been found with the scansConnectDie/DisconnectDie- Despite the name this add or removes die from the connection blacklist. It’s done this way since actually trying to connect is done asynchronously.SendDieBlink- Command the die to blink it’s LEDsGetDieDescription- Get the fixed description of a die from when it was found in the BLE scan.GetDieRollUpdates/GetDieBatteryUpdates- These dump a queue of events that occurred since the functions were last called.
Deciding on how to implement the GetDieRollUpdates function was the hardest part of this interface. This takes a C++ vector as an argument and fills it (using swap to avoid copying) with all the roll events for all the die that occurred in the background since the last call. The main issues with how it’s currently implemented are:
- It uses dynamic memory. As it’s currently implemented, the amount is bounded, and it shouldn’t do new allocations after it’s been running awhile (These are features of the STL vector class). However, bounding the memory means that it needs to drop events if it fills up. I could have used a
std::arrayinstead, but that would always use the max amount of memory and means the size would be part of the library interface. - It’s not intuitive unless you’re fairly familiar with C++. This is probably the biggest issue. The actual type used here is
std::vector<std::pair<PixelsDieID, RollEvent>>; a vector of dice ID paired to rolls. Arduino goes to pretty great lengths to hide C++ details so maybe I should have found a way to make this more beginner friendly.
Side Bar on Using Global Static State
For this sort of embedded design, I don’t see a ton of point in trying to avoid the use of global state (static class members or static global variables). Generally, a C++ header file should depend on as few other headers as possible. This speeds up compilation time and makes the libraries less interdependent. Since I don’t want to expose the implementation details in the header file, I’d need to use the PImpl Idiom if I wanted to avoid global state. Since BLE functionality is shared on the system anyway, the system is always going to be a singleton. Also, since all the functionality needs to wait for the hardware to respond, there’s not much danger of hitting a Static Initialization Order Fiasco. One choice I made that was mostly stylistic, was to make the library out of functions in a namespace instead of class.
ESP32 partitions
I hit a problem right away as I tried to make a more substantial demo project. Using both the BLE and WiFi functionality (at least as Arduino libraries) pushed the size of the application past the limit that could be uploaded to my ESP32.
First, not all ESP32 have the same flash size. The flash is the persistent storage used to load the application. It can also be used to save values, or even as a basic file system. My particular device had 4MB of flash, and the build output was 1.6MB, so I was surprised it didn’t fit. It turns out that when compiling, there’s an additional configuration that describes how the flash is expected to be used. This is the partition file.
Here’s a guide to some of the details for the partitioning.
For just building the application, I just needed to make the application partition big enough. If I needed to support wireless updates, or storing data, I’d need to think a bit more carefully on how to allocate things. For my example app, I left OTA support, but got rid of the factory partition, and didn’t include any additional storage: https://github.com/axlan/arduino-pixels-dice/blob/main/examples/WebRequest/no_factory_4MB.csv
Making Embedded Libraries
So now that I had the library code and some basic examples, I wanted to make them easy to use. The two main environments I’m aware of for doing hobbyist embedded development ard Arduino and PlatformIO.
Arduino
The arduino IDE has a built in library manager that let’s you download from a database of projects. A big part of this whole exercise was to finally make something that I thought was worth adding, and seeing what the process was like.
The process is documented in https://github.com/arduino/library-registry/blob/main/README.md#adding-a-library-to-library-manager, and it’s actually pretty simple.
- Make sure the code conforms to the Arduino library specification. This is mostly meeting certain file layout requirements, and having a library.properties file that describes the library.
- Submit a pull request on the Arduino repo.
That’s really it. It appears to be fully automatic, and after a day, my library showed up and could have it’s examples opened as projects.
I made a video demo for using the library in the Arduino CLI:
The Arduino library has a device setting for configuring the ESP32 board you’re using and setting up the partition, so the developer still needs to figure that out.
Library link at: https://www.arduino.cc/reference/en/libraries/pixels-dice-interface/
PlatformIO
I actually prefer PlatformIO to the Arduino ecosystem quite a bit. It’s much more flexible and it lets me stay in VSCode.
Unsurprisingly, making a package was even easier then the Arduino. It even let’s you re-use the Arduino library.properties file for the library description.
All that was needed was to run the pkg command as described here. The PIO CLI can be brought up in VSCode as described here.
That was it. However, I wanted to be able to run my examples in PlatformIO with a checkout of the repo without needing to modify it after checkout. This turned out to be surprisingly challenging.
While PlatformIO is more flexible then Arduino, it still makes implicit assumptions about the directory layout. While there are lots of options to configure this by changing the settings in the platformio.ini file, I didn’t find a great way to be able to setup “build targets” for the examples that would show up in the project tasks menu. This was a combination of PlatformIO really being designed around the idea of each project only having out output, and trying to keep the Arduino library directory structure.
Eventually, I went so far as to write a python script that manipulates the build directory during the compilation process. There’s an option to specify extra_scripts to run Python scripts before or after the build with access to the build state. The details are much deeper then I got, but I was able to hack something together to move the example files to the src directory as part of the settings for different build environments (see the library platformio.ini).
I relied on “custom” build settings prefixed with custom_ that get passed to the scripts.
This is probably a horrible use of this mechanism, but it was a challenge and made further development a bit easier.
Library link at: https://registry.platformio.org/libraries/axlan/pixels-dice-interface