
LAN Pets
I made a network monitoring tool that uses the data it collects to make a neighborhood of virtual pets.
Source code available at https://github.com/axlan/lan_pets
I’ve been kicking around ideas around this concept for awhile. It combines a few of my long term interests into one project:
- Weird virtual pet projects including the memorable Tamagotchi singularity (video of talk)
- I had a whole series of projects setting up home LAN monitoring Creating Home IT Monitoring with checkmk
- A bit more abstract, but I’m always on the lookout to use real world data as a input into creating video game assets.
- I think I first saw this with the monster rancher game series that would generate monsters based on CDs.
- There was also a game Skannerz that would generate monsters from scanned bar codes.
- Another example is Operation: Inner Space that would use the icons from the PC it was running on as resources within the game.
- I did something somewhat related as one of my earliest programming projects web war that would generate 2d levels from website HTML.
My goal was for this to be a useful tool to keep track of devices and their services, as well as being a cute way to anthropomorphize them.
I wanted to get a minimal version done quickly and add bells and whistles later. This put me into a long spiral where I wanted to add “just one more feature” before it was ready to show to people.
This write up might be a little less detailed in sections since I have been working on it on and off for almost a year.
Development Process
Prototype
The core features I wanted were:
- A way to get a list of devices on the LAN
- A web GUI for showing the results
- A way to generate Avatars for each “pet”
Scraping the Router
For getting the network information, my first thought was to get the DHCP reservations from my router. These contain the MAC and IP address of all the devices using DHCP (everything on my network) along with self identified host names.
Unfortunately, my router does not have a particularly well documented API. It does support a SNMP interface (See my article about SNMP), but I decided it would be simpler to scrape the web UI directly.
The authentication wasn’t obvious, but I found this other blog post as a starting point https://medium.com/version-1/reverse-engineering-my-router-part-2-ea2602c9660d. The basic idea, is that the router sends some parameters that the client uses to encrypt the password. This returns a cookie that is used to authenticate for the rest of the session.
I wanted to be able to implement this in Python, so I used the browser’s debugger to step through the authentication process. It was using PKCS#1 v1.5, but it took me a bit to figure out that it was padding out the plaintext a bit differently than the Python libraries did. It was easy enough to make a custom encryption call that matched the router.
Once the authentication was working, it was actually very easy to get the data I wanted since it was all returned as JSON from easy to understand endpoints.
Django Web Frontend
The longest part of the planning phase was deciding what set of technologies I wanted to use for the web GUI. I knew I wanted a Python backend, so I figured I’d finally give Django a try. For the frontend, I was leaning a bit toward htmx. After some thought though, I decided to keep things simple and not use any frontend framework. I realized that there weren’t really any features that needed ajax or anything fancy, and especially for the prototype, using the backend to package the data would be sufficient.
I followed a bunch of Django tutorials to get started. At the start, I tried to use Django for as much as possible. For example, I initially structured the data into a model that could be used to generate and validate a HTML form. However, as I went on I often found the Django implementation to not exactly match what I wanted and I ended up ditching most of the Django integration for doing things directly in Python or HTML. This is probably mostly due to my lack of familiarity with Django and the fact that nothing I was making needed to scale or manage sessions.
In the end, I probably could have gotten away with just using Flask for the HTTP processing and routing and Jinja for templating.
I am awful when it comes to UI design. I don’t do it enough to have much practice, I don’t have the patience to work through the fiddly details, and what makes sense to me does not generalize. My wife graciously volunteered to make a cute layout to display the info I was scraping from the router. I ended up continuing to bolt things onto this design as the project went on.
At this point I needed a way to get the data I was scraping from the router to the GUI. Django has some plugins for running tasks periodically, but I decided to make the different parts of the project fully autonomous. The scraper would be its own process that would write to a database which the webserver would read from. To keep things simple I just used an sqlite file.
Generating Pet Avatars
The last feature I wanted for the prototype, was to make the avatars for each pet. Initially I looked at sprite sets, either ripped from old video games, or available as asset packs for developers.
- https://www.spriters-resource.com/lcd_handhelds/tamagotchiconnectionversion2/
- https://itch.io/c/1346641/animals
When mentioned what I was working on, a friend suggested a “paper doll” site called https://picrew.me/en/
This site is a fun blast from the past by itself. It lets you create a character from a variety of layered images that can be composed together. They also provide a mechanism to randomly generate a character. The community contributes these image sets and you can generate everything from cute animals, to buxom anime girls.
I don’t want to encourage people to scrape Picrew so I’m not going to go into detail of how I downloaded and arranged the assets I’m using. The creators all have them marked as allowing non-commercial use, but this probably goes beyond what they were expecting.
In the end I made an interface where avatars could have some of their “parts” specified explicitly with the rest filled in randomly.
My goal was to be able to have pets share appearance based on the real world device they were representing.
I choose the image type based on the type of device (phone, PC, IoT, etc.). MAC addresses used to identify HW on a network use some of their bytes to identify the manufacturer (Organizationally unique identifier (OUI)). I used a table to lookup the manufacturer and would use this string to seed the shapes used for the pet so only the colors would be randomize.
For example, all IoT devices use a “Nyan Cat” image. All IoT devices with a OUI from “Nest Labs” will share the same face, hat, and other shapes:


While an IoT device with a Realtek network will have both randomized color and shape:

While this is neat, and might be more obvious with more detailed avatars, I doubt anyone would notice this in practice.
While I use the word “randomized” here, they use their name as a seed to ensure the same device will generate the same avatar each time. The avatar files are also cached and only generated the first time a new device is referenced.
Continuing Development
With the prototype done, I needed to decide what I wanted to do next.
I decided on three goals I wanted to achieve before I called the project done:
- Add interactions between the devices so that they have some “pet” behaviors
- Make it useful and/or interesting enough that I would personally want to use it
- Add enough capabilities and polish that it could hypothetically be used by someone who isn’t me
This mostly meant that I would take a look at the project and add the next feature that I thought got me furthest toward completing these goals.
I’ll outline the features I ended up adding and some of the specific challenges in the following sections.
As the features started piling up, I eventually hit a point where my initial architecture was starting to have issues. I had originally envisioned each monitor (ping, SNMP, router scraping, etc.) to be independent processes. They each had their own DB so they could collect the data in a format that made sense. A central manager would then translate this into the data that would be reported to the frontend. As I added more types of data, and multiple different approaches to gathering overlapping data, this started feeling inefficient. Since each feature was slightly different, it was hard to reuse code, and the details of the monitoring components ended up leaking into the central manager.
I eventually bit the bullet and refactored things to use a single sqlite DB to manage all the collected data. Since I was further along it was easier to come up with a schema that could be shared across the monitoring processes. I was able to take a test driven approach to implementing the main data querying layer, and remove a lot of the redundant code.
This made it a lot easier to get the project across the finish line, and hopefully will make it a lot easier for anyone looking at the source code in the future.
UI Additions
As I mentioned, my wife did the initial prototype HTML/CSS. I used that as a bit of a template to display the rest of the data I was throwing in there. She ended up helping again with the data usage display.
I did try to add some decent navigation quality of life features. Pretty much wherever a pet is mentioned is a link to its page.
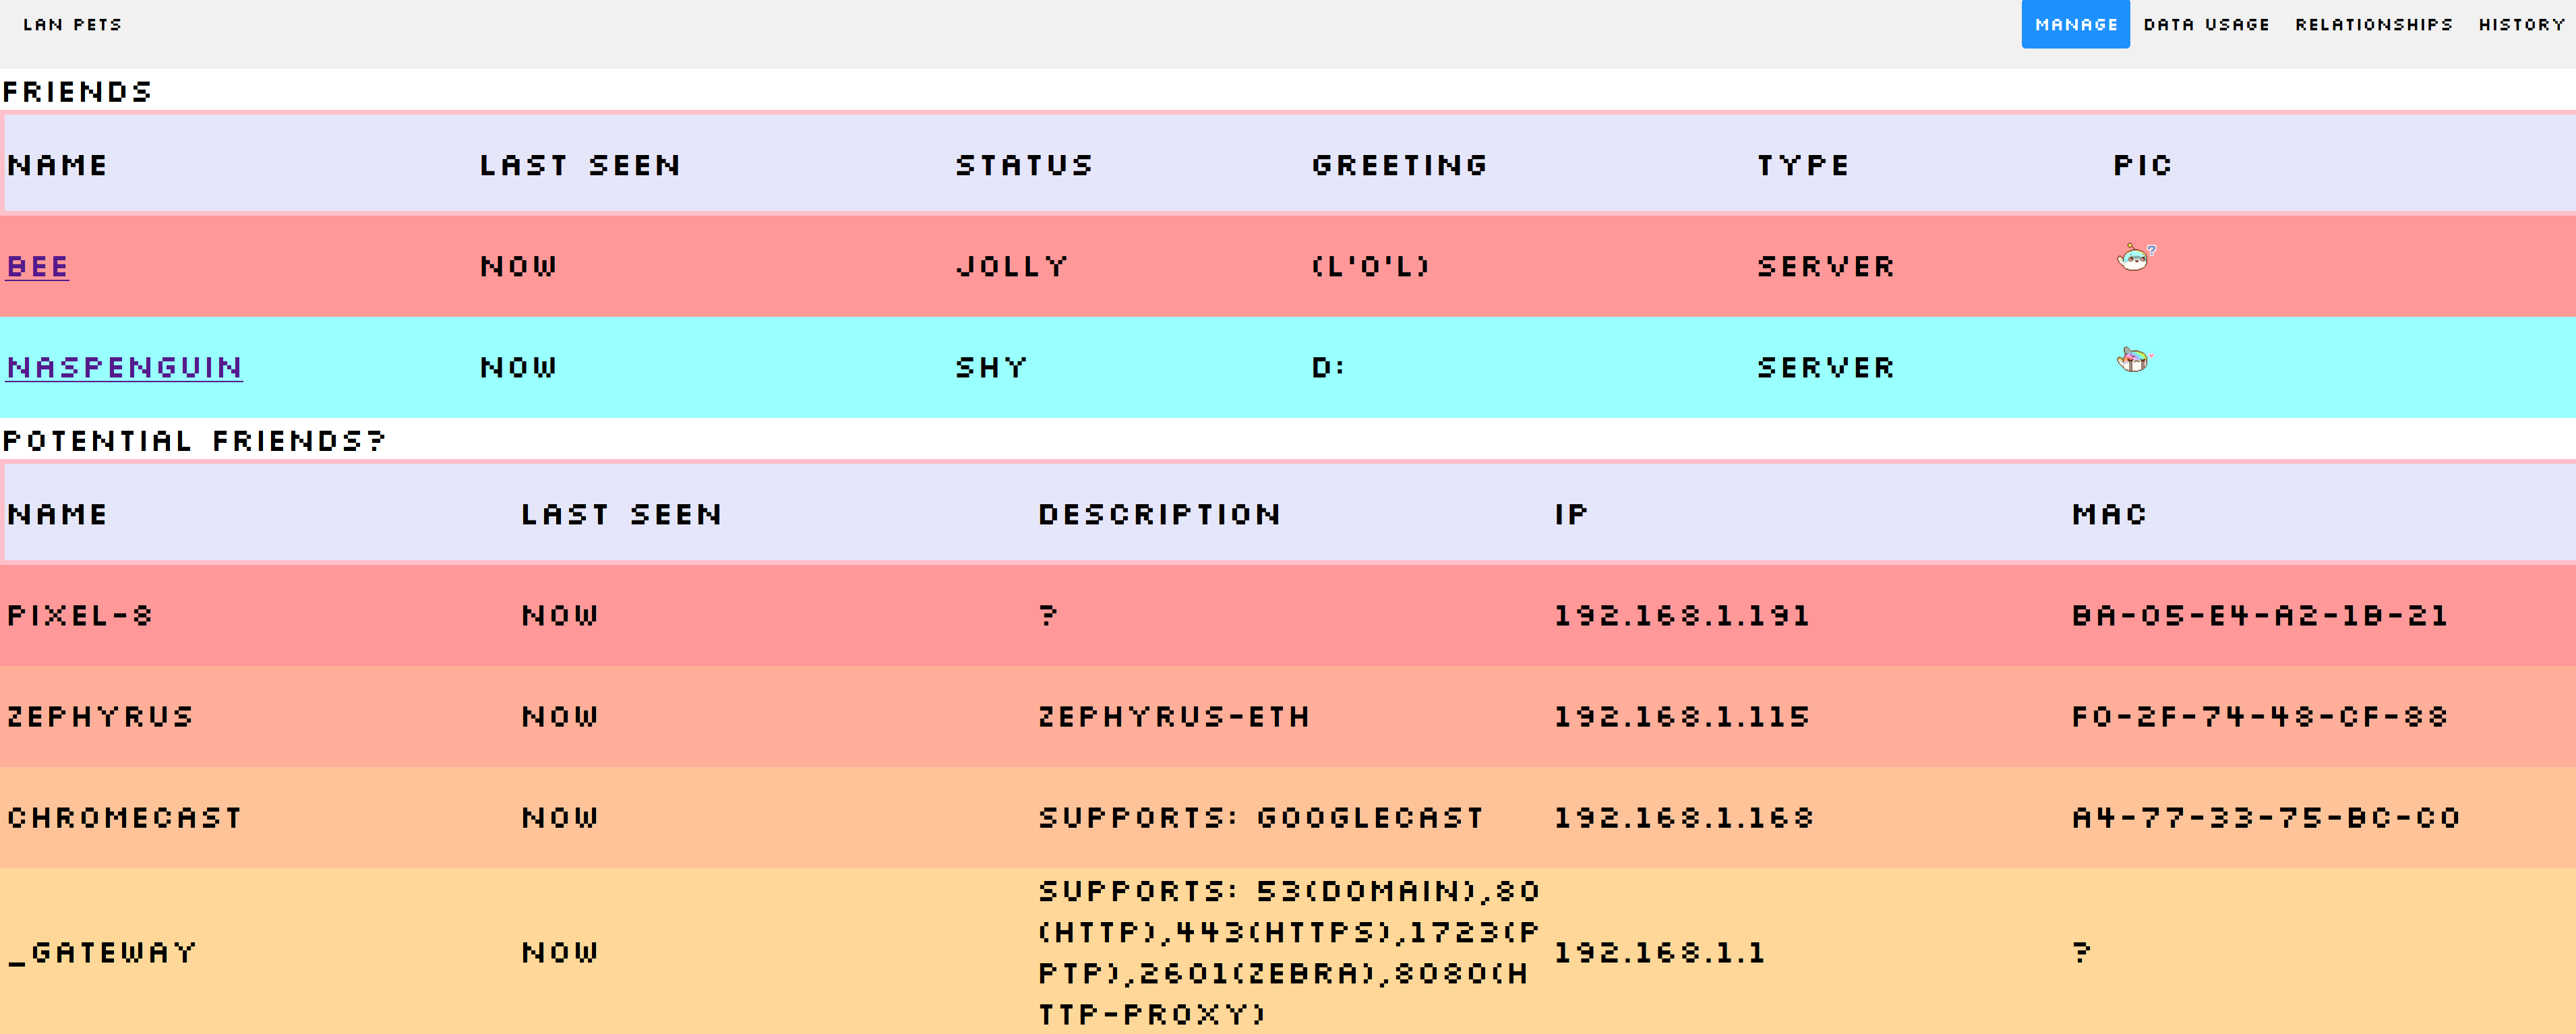
This is the page to see the list of pets, and the devices found on the network that haven’t been added. If you click on one of the discovered devices, you get a prompt to register its MAC, IP, or host name as a new pet.
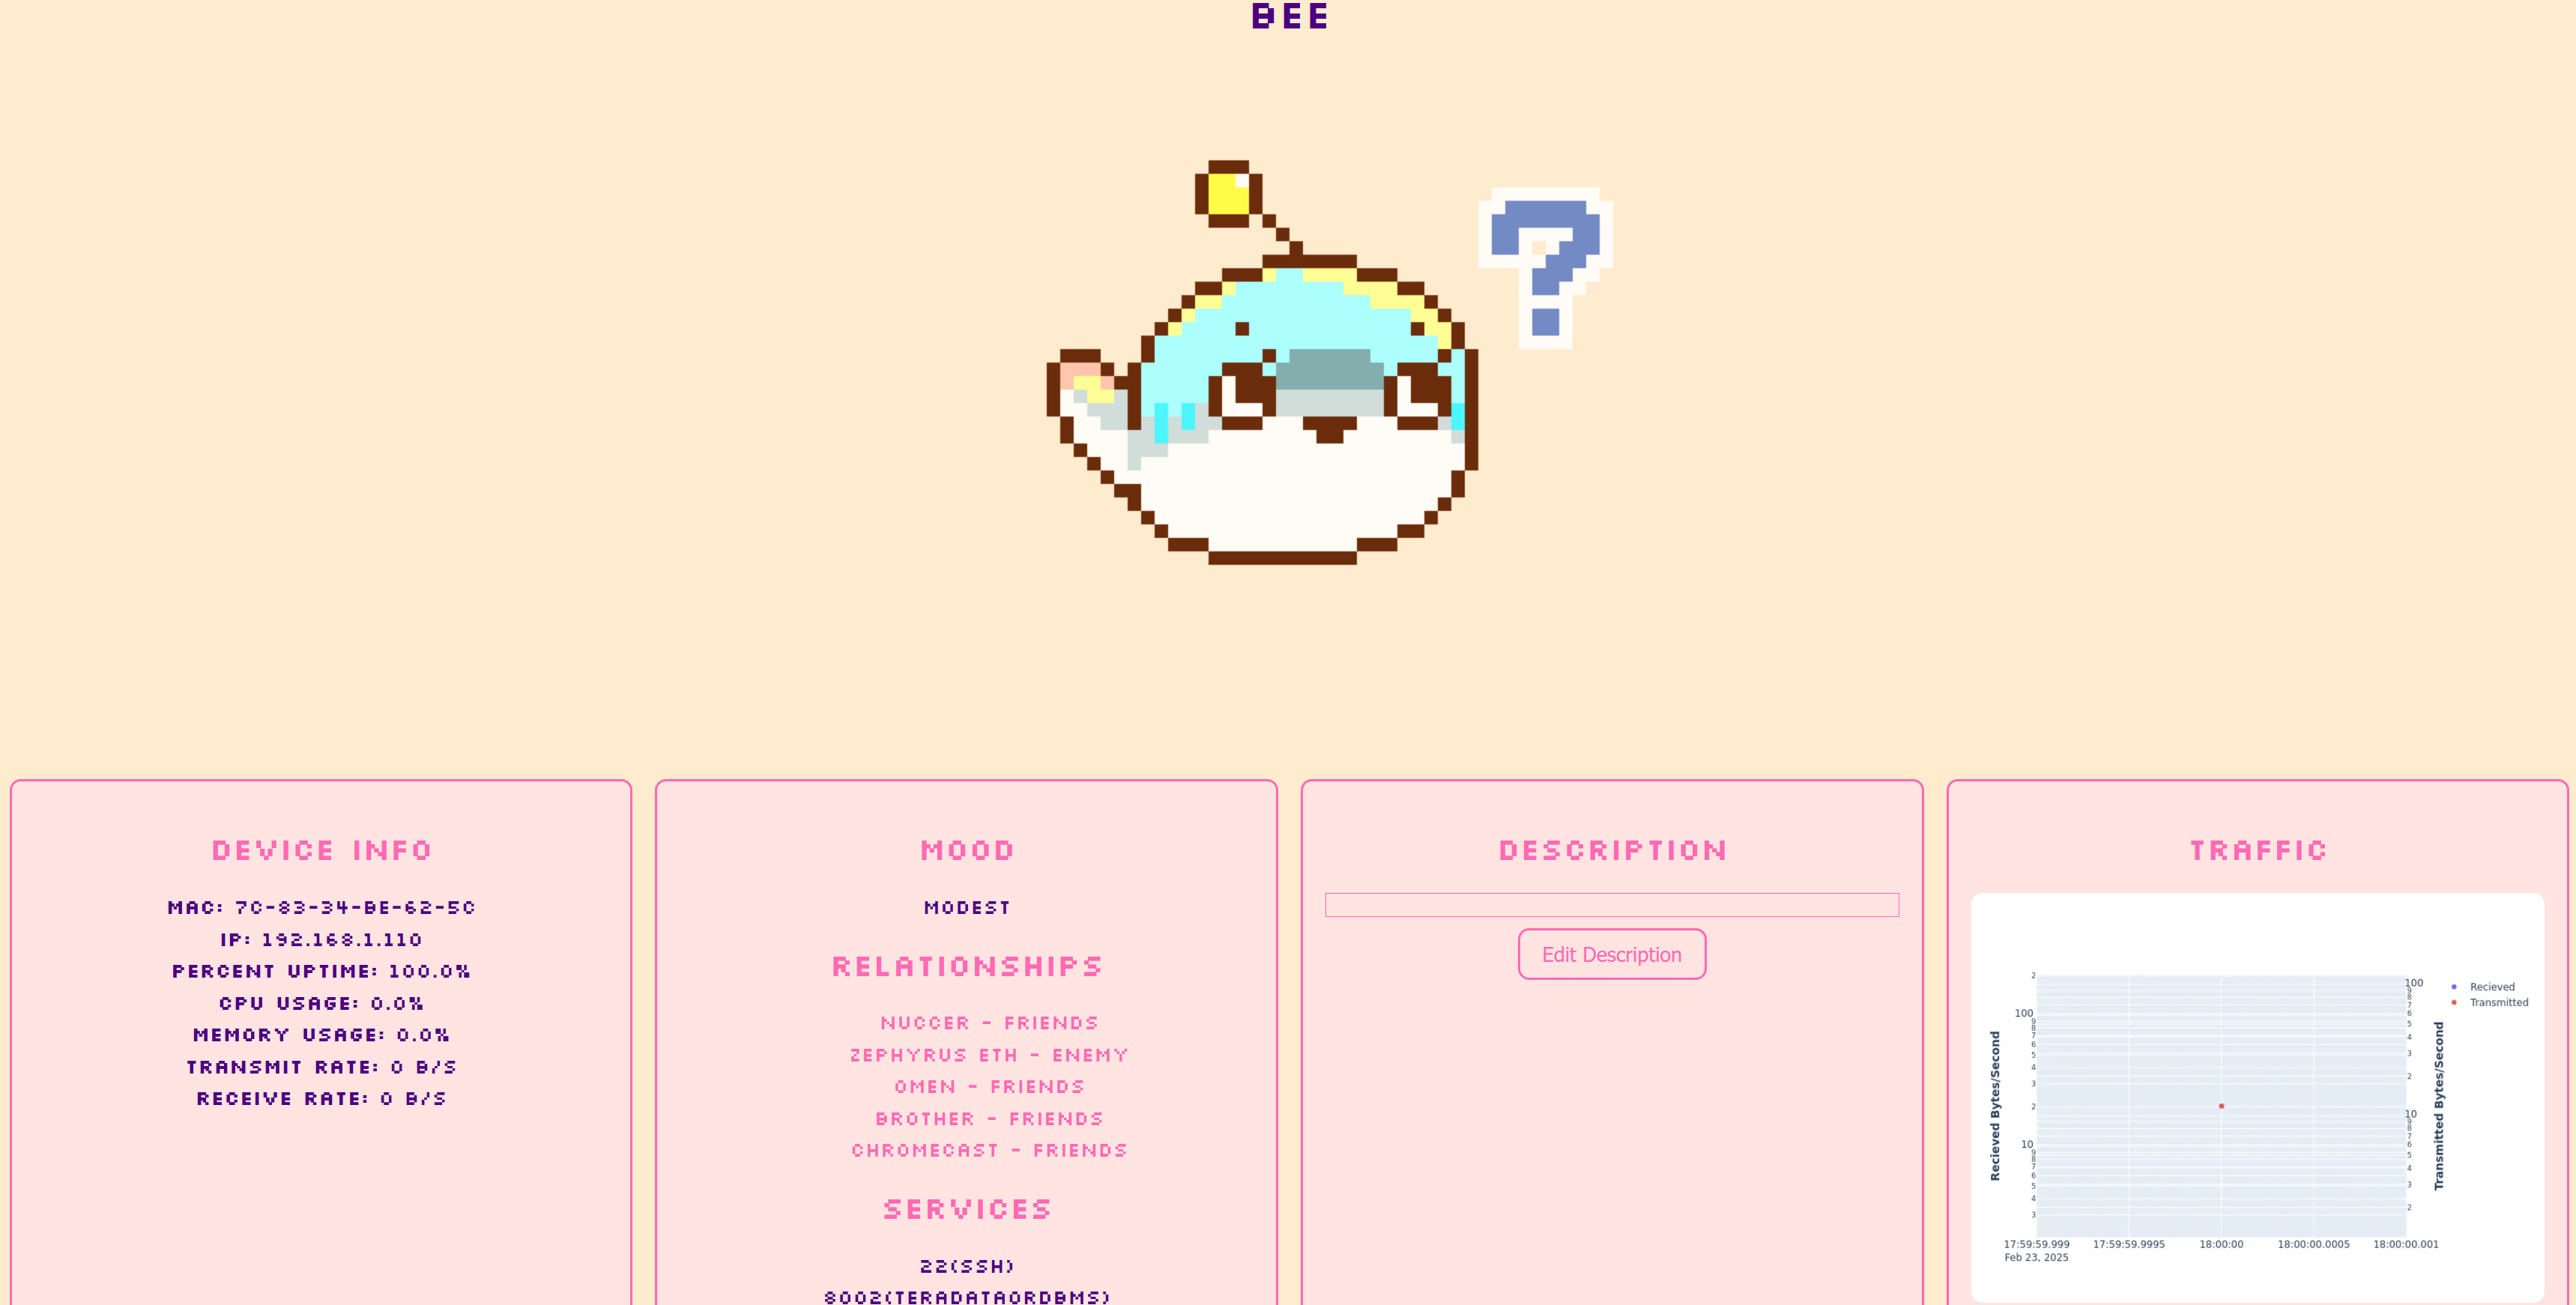
This is the page for viewing information for one of the registered pets. The backend uses Plotly to generate a static image for the plots. I could have made them interactive, but it seemed like more trouble then it was worth. Another thing to note is the “Description” section. I added this so that I could manually write notes that would be relevant for a device. While I could have come up with a schema for entering and displaying the different types of information I might be interested in, I currently just have it record and display HTML directly. I just added a macro to substitute in the devices IP to make links update with the latest known IP for a device.
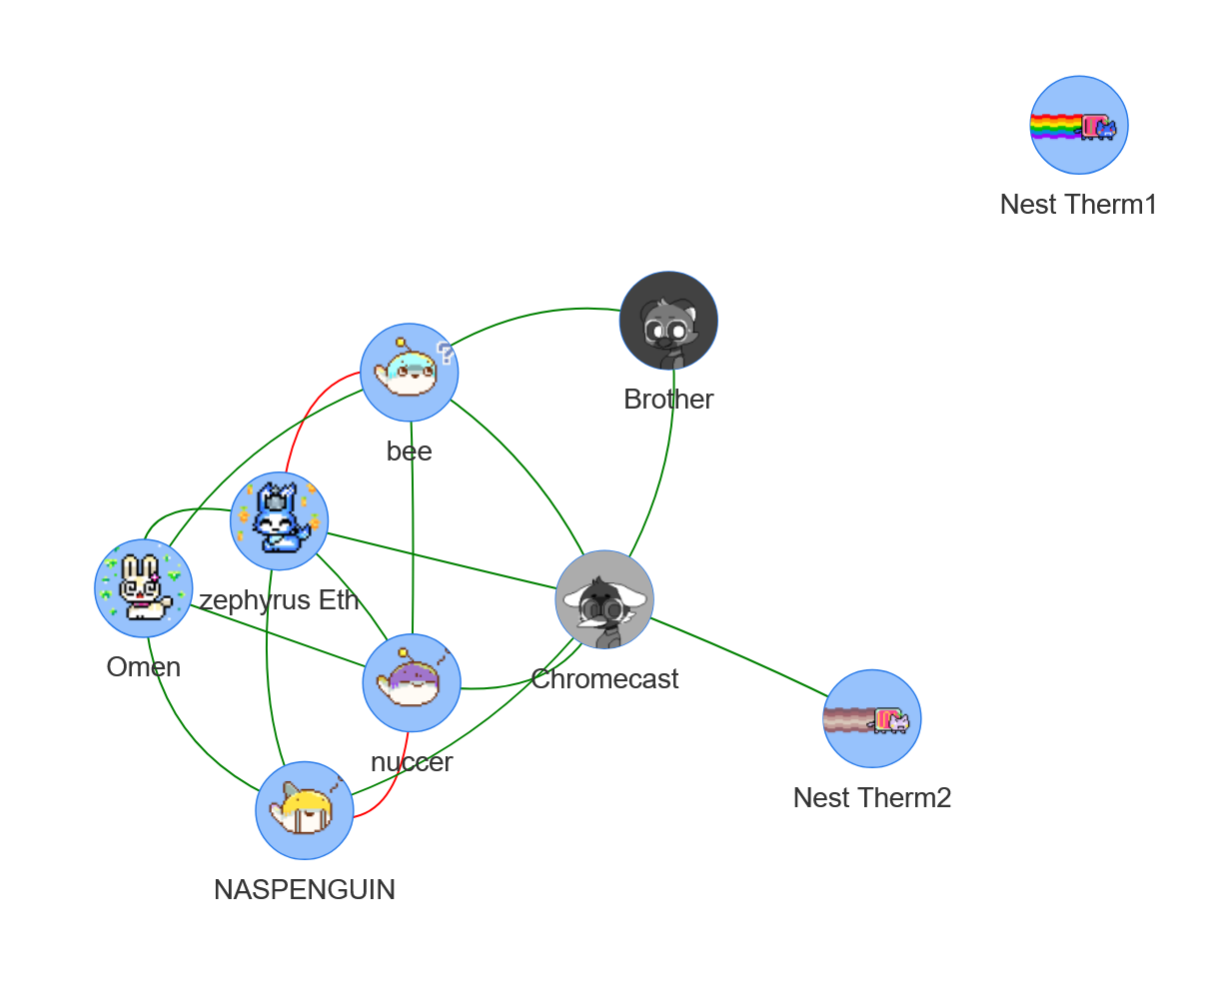
This is a pretty basic use of the Javascript Vis library to generate an interactive network graph of the pets’ friends and enemies.
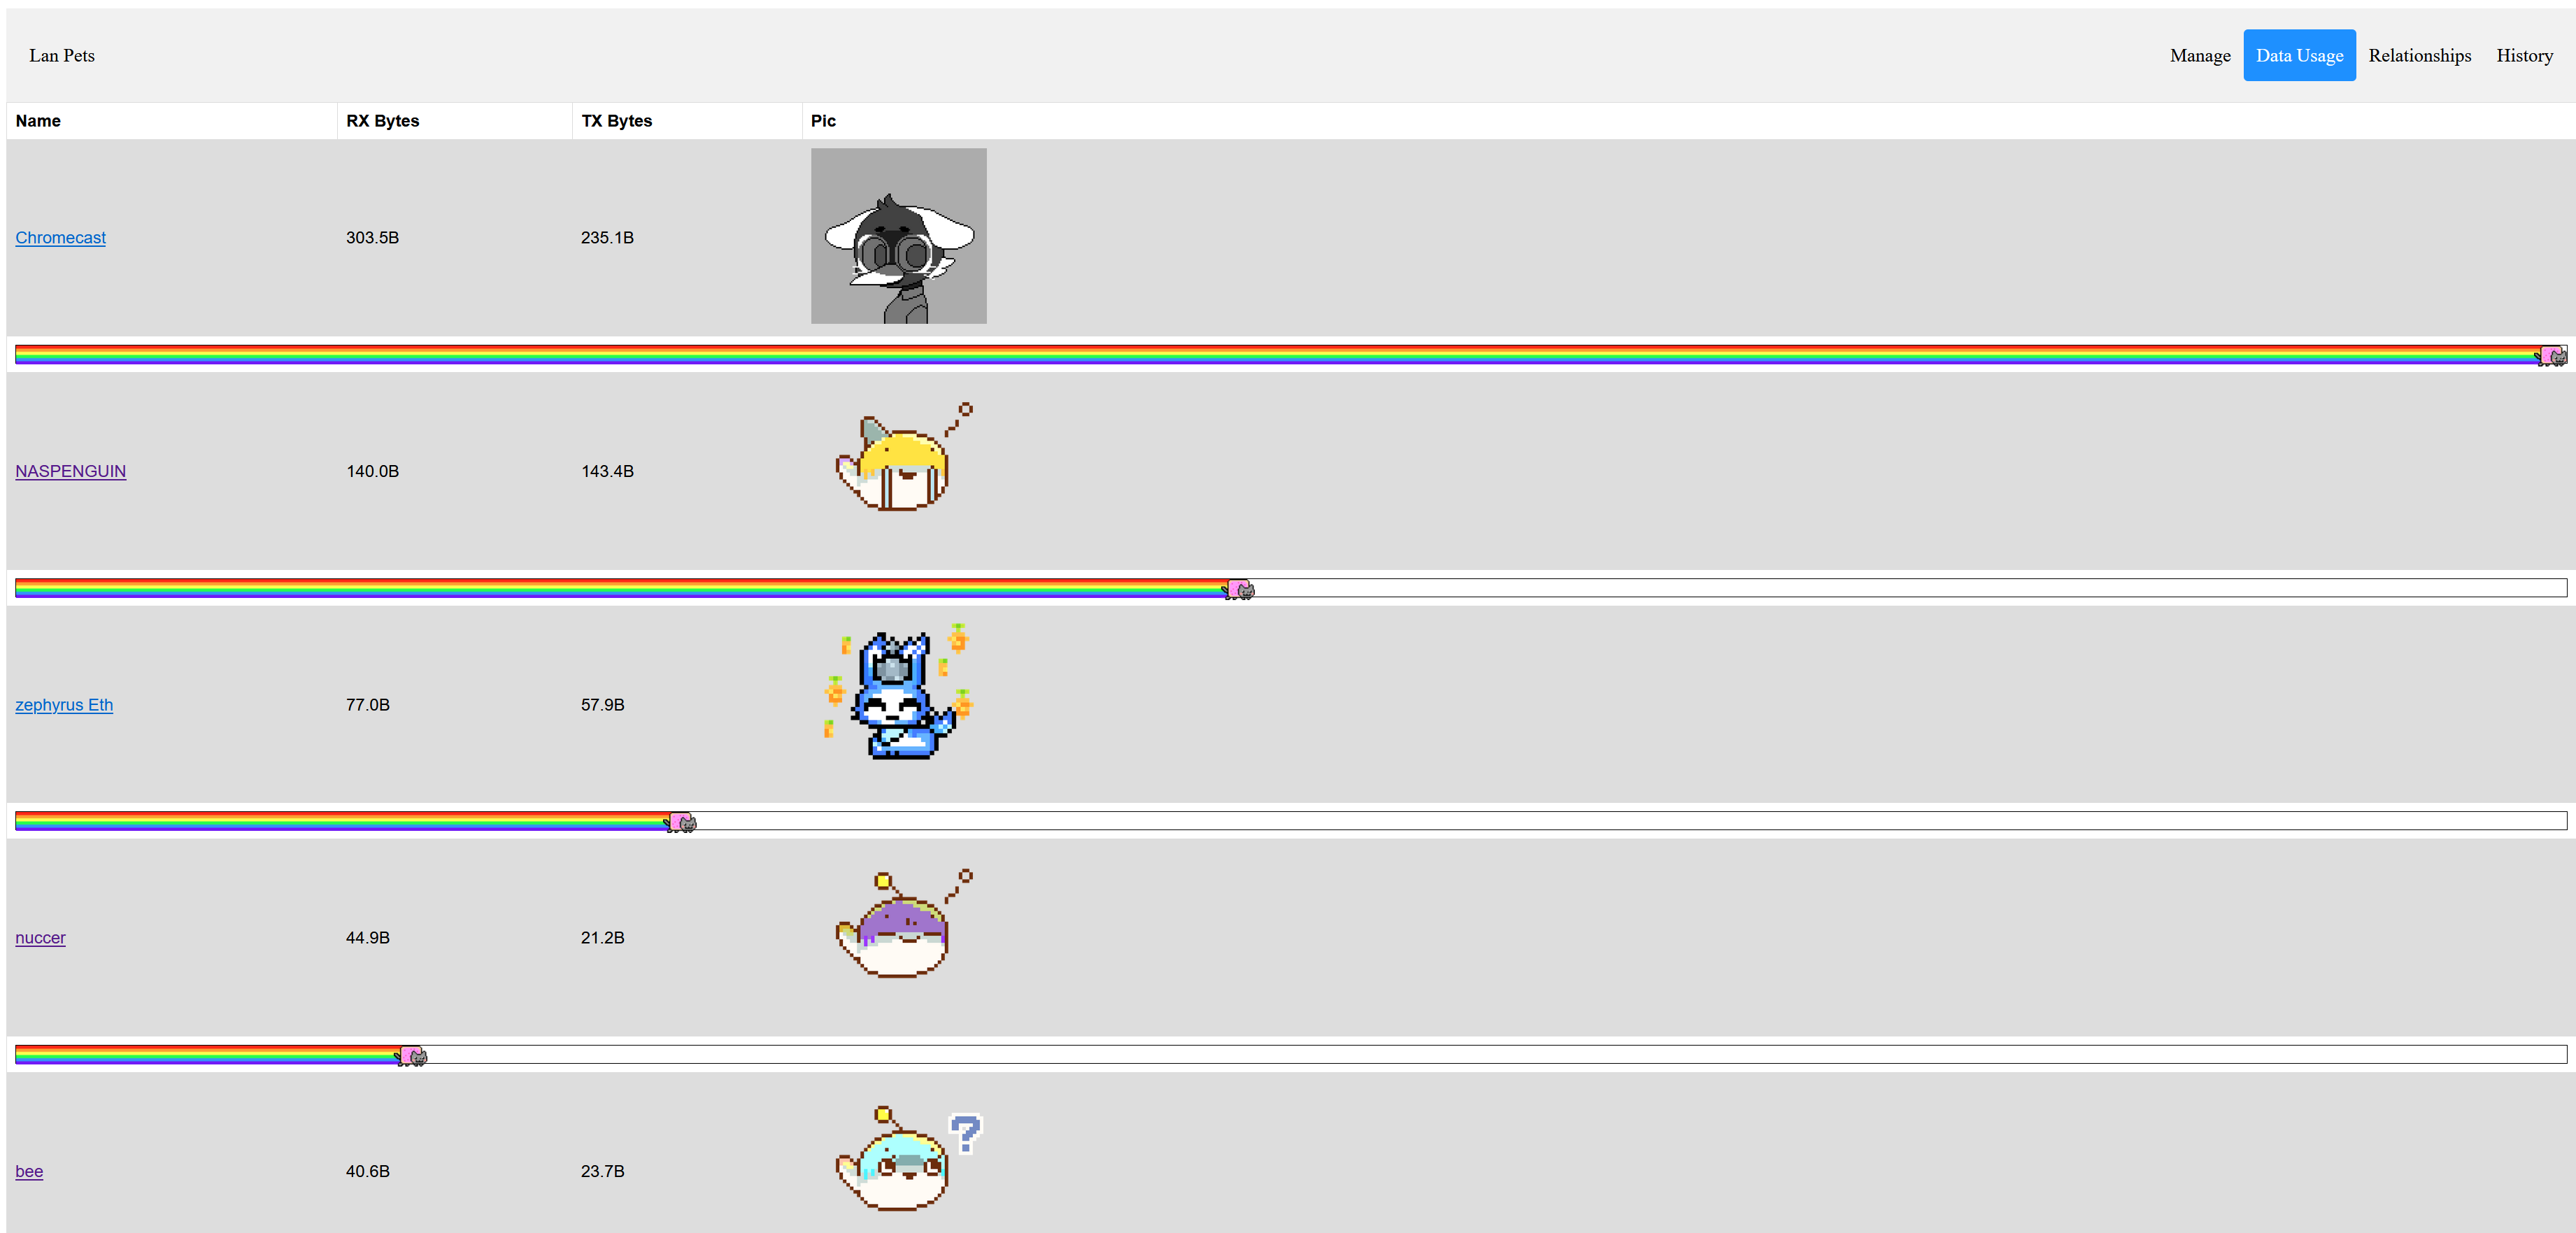
This one I added since I had the idea for a Nyan Cat progress bar.
In addition to these pages, you can view the log of the relationship and mood updates for the whole network, or for an individual pet. I did this by just dumping the text from the logs to be displayed.
Some notable features that are lacking here are any sort of authentication, and some obvious security issues like cross site scripting vulnerabilities. This is meant to be an internal only page, and would definitely require hardening to be widely released.
Monitoring Features
Settings
This isn’t strictly a monitoring feature, but I figured I’d mention it here. Implementing project configuration management is always a bit of a pain. You can spend a ton of time writing an understandable CLI or trying to define configuration files.
One thing I find especially challenges is to make a configuration interface play nicely with Python type checking, which I find greatly improves my own code quality.
For this project I decided to use python files directly for specifying configuration. There’s a few approaches to this, but since this doesn’t need to be bullet proof, I took a pretty basic approach as show in https://github.com/axlan/lan_pets/blob/master/pet_monitor/settings.py. The one complication is that it supports loading a secret_settings.py file with settings that aren’t checked into version control.
The main advantage to the Python file approach is that it’s infinitely flexible. A similar approach is actually used by Django itself.
I think I’d use this approach again for any future Python projects since it really just made this whole area of development easy.
The settings here let you enable/disable the various monitoring methods and tune things like how often they run.
SNMP
In working on this project, I finally spent the time to actually understand SNMP, and I decided to write a whole article about SNMP. Long story short, it’s an interesting idea for a universal way to get device information that doesn’t really live up to its potential.
I made a monitor to get CPU and network stats from devices that support it, but few do out of the box. It’s not terribly hard to get a Windows or Linux PC to enable support, but it does require a much more intimate knowledge of this technology then seems reasonable.
Toward the end of the project I was able to get routing information from the router over SNMP that could aid in Network discovery (RFC1213-MIB::ipNetToMediaPhysAddress). This is the most “universal” method I found aside from scraping, but it’s pretty limited since it will continue to show routes for devices that have been reassigned by the routers DHCP server.
Ping
I use pinging as a simple way to check if pets are online.
I assumed pinging known devices to roughly monitor uptime would be straightforward, but it turns out that generating a “ping” packet requires some escalated privileges.
I ended up having to run:
echo 'net.ipv4.ping_group_range = 0 2147483647' | sudo tee -a /etc/sysctl.conf && sudo sysctl -p
if I wanted to be able to ping without root privileges.
NMAP
For my goal of making this project usable by others, I needed a fallback to getting a device list from the router. When it comes to discovering devices on a network without any sort of cooperation from those devices, NMAP is the obvious way to go. NMAP uses network requests to discover and probe the capabilities of devices on the network.
I wrote a service that would run NMAP scans in the background to discover devices and create lists of the services available.
NMAP is one of those tools that have a whole world of features and sub-tools built into it. A bit of a departure from the Linux philosophy of “doing one thing well”. However, this comprehensiveness is what allows it to simplify complex tasks.
One last bit of praise. I found the documentation https://nmap.org/book/man.html to be among the best I’ve seen. It breaks down each CLI parameter comprehensively, along with clear notes on how they interact, and suggested usage.
Like ping, NMAP needs root access for its full set of capabilities.
I was surprised by the effect that NMAP could have when it did various TCP connection probes. My Windows 11 machine would wake up from sleep whenever a TCP connection was opened. I had to change the network adapter settings to disable this wake up functionality. NMAP also has the capability to try to scrape information from HTTP servers. I found that this could actually crash some of my IoT devices with particularly basic HTTP implementations.
Another weird behavior I found, was that the default scan settings would end up taking forever when I scanned the full 155 IP range. I could relatively quickly scan the full range if I did it in pieces, but specifying the whole range all at once would never finish. It worked fine when I used some flags that speed up scanning, so I’m not sure what was going on.
mDNS
mDNS is a pretty interesting technology for devices to advertise their presence on a network. This is often used by things like printers, and is even the way my favorite IoT LED project WLED has its phone app find devices.
It was very simple to search the network for mDNS advertisements as yet another way to discover devices on the network. This one is especially nice since the devices often include human readable names that make it easy to pick out what exactly a device is.
Approach to “AI”
I wanted the pets to do interesting things based on the real world behavior of the device it mapped to.
I considered using an LLM to generate narratives, or messages between pets, but in the end I decided to keep things simple.
- I made a table of emoticons the pets could use to greet you
- I assigned the pets moods based on their network activity
- Pets would randomly make/lose friends and enemies where the probability was influenced by the pets moods
This doesn’t make for the most compelling interactions, but it felt like a good enough starting point to get the idea across.
Notable Challenges
SQLite Quirks
I ended up sticking with SQLite to store data and synchronize it between the webserver and the network monitoring process.
I’m no expert at SQL, and this ended up being the portion of the code I struggled with the most.
I hit a few instances where the queries I wrote were so inefficient, they would take minutes to sort through the DBs that were only 10’s of megabytes in size.
Here’s an example where I wanted to get the last time a pet was successfully pinged. I went from this inefficient query:
1
2
3
4
5
6
7
8
SELECT n.name, r.is_connected
FROM ping_results r
JOIN ping_names n
ON r.name_id = n.row_id
WHERE r.timestamp =(
    SELECT MAX(timestamp)
    FROM ping_results r2
    WHERE r.name_id = r2.name_id);
to
1
2
3
4
5
6
7
8
9
10
SELECT n.name, r.is_connected
FROM ping_results r
JOIN ping_names n
ON r.name_id = n.row_id
WHERE r.rowid =(
    SELECT rowid
    FROM ping_results r2
    WHERE r.name_id = r2.name_id
    ORDER BY rowid DESC
    LIMIT 1);
Another issue I had to contend with was the Python SQLite connector commit behavior. By default Python will lock a DB file when you open a connection to it. This ensures that changes are made atomically. This worked fine when the DB was basically empty, but as I continued development and tested with more data, I had to be more intentional with how I was locking the DB.
Mapping Pets to Network Monitor Information
With all the different methods I had for collecting data, it became hard to make sure that I was actually referring to the same devices consistently.
When I was using MAC addresses as a required unique key, this was straightforward. However, since not all ways of discovering devices reports a MAC address, I needed to make things more flexible.
For example what if a pet had a primary identifier that was a host name, and the IP address and MAC address associated with it changed?
I use the schema:
1
2
3
4
5
6
7
8
9
10
11
12
13
CREATE TABLE IF NOT EXISTS network_info (
    row_id INTEGER NOT NULL,
    mac VARCHAR(17),              -- MAC address (format: XX-XX-XX-XX-XX-XX)
    ip VARCHAR(15),               -- IP address (format: IPv4)
    dns_hostname VARCHAR(255),    -- DNS hostname
    mdns_hostname VARCHAR(255),   -- mDNS hostname
    timestamp INTEGER,            -- Unix time last updated
    UNIQUE (mac),
    UNIQUE (ip),
    UNIQUE (dns_hostname),
    UNIQUE (mdns_hostname),
    PRIMARY KEY(row_id)
);
I would try to associate these network identifiers based on the different types of device discovery I was performing. I’d combine overlapping results and conflicts would result in older results being dropped. Pets would be associated to the network info that matched their identifier, and their ID would be used to identify results from monitors that gather periodic data. This has limitations, but I was able to mostly contain the complexity around this behavior to a single DB update function.
Client Side Service
One feature I had planned, but didn’t end up implementing, was a custom server to run on computers on my network. This would let them interact with this project more directly.
The idea was that I could run a service on my PCs and custom IoT devices that would send exactly the data I wanted, and might even be able to display the mood and relationships on the devices themselves.
My first instinct would be setting up MQTT topics for this.
There’s nothing especially hard about this, but I needed to call the project done at some point.