
AWS IoT Setup
As a followup to NodeMCU Development, I decided to connect my project to the AWS IoT cloud to see what that entailed. Turns out, it’s a huge amount of headache for not much gain for a small project. I can see how it would become useful if I was deploying hundreds of devices, but it doesn’t really streamline the hobbyist workflow.
Design decisions
The basic functionality I wanted was a UI for controlling a display. Possibly add some somewhat low latency control to be able to sync it with music. Otherwise, I’d just want to get some basic status and maybe monitor a single switch.
Simplest
My previous ESP8266 projects generally worked like this:
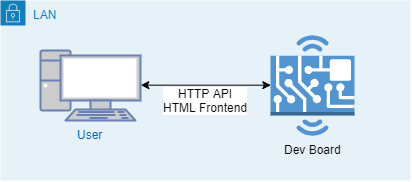
A web server running on the board would be both the frontend, and the backend. The board would serve HTML and handle an HTTP API for sending commands and receiving data.
Pros
- Self contained. There’s no configuration living anywhere except what’s programmed onto the board.
- Works on LAN with no internet.
- Simple infrastructure
Cons
- Updating HTML is relatively difficult since it’s compiled into the microcontroller code.
- Device is only accessible on LAN
Moving to the cloud
Initially I wanted to move the HTML hosting off the board with a setup like:
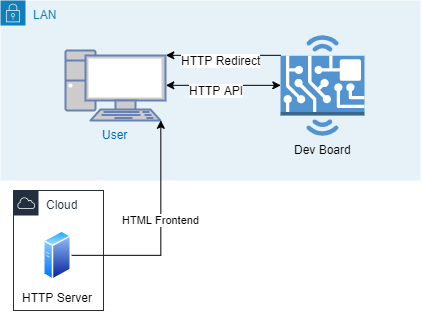
I would have the index HTML request to the board redirect to a cloud HTTP server along with a query string giving the boards LAN IP. Something like:
1
2
    server.sendHeader("Location", "http://www.robopenguins.com/board_frontend/?API_URL=" DEVICE_IP );
    server.send(308);
Then this parameter would be used to make cross origin AJAX calls in the HTML scripts. This can be done with static HTML pages, or a more dynamic web server.
Pros
- Simple HTML development that can be deployed independently from the device firmware
- Simple infrastructure
Cons
- Need to manage both the board and web server
- Device is only accessible on LAN
Going all in on AWS
While I was on this train of thought, I decided to see what it would be like to use a professional IoT stack instead of rolling my own. I briefly looked at the Arduino IoT Cloud, but it looked like I’d need to pay to even explore it. I looked at AWS next, and since it was basically free for the traffic I’d planned, I decided to give it a go.
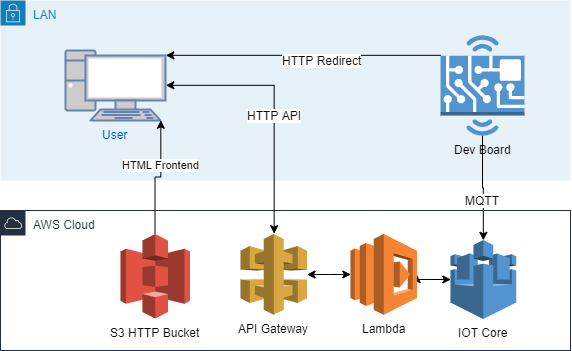
Here’s the high level design I came up with:
Pros
- Brush up my AWS skills
- Relatively straightforward to add new interfaces (Alexa, smartphone, etc.)
- Relatively straightforward to add new features (auth, logging, etc.)
- Pipeline is very flexible and could easily be used for future projects
- Securely accessible through WAN
Cons
- Many pieces of configuration scattered across device and AWS
- Much more complicated infrastructure
- Dependent on many services with complicated interactions
- Very tied to specific AWS services, potentially hard to migrate
After the fact, I also found a write up for another project that took a similar approach: https://aws.amazon.com/blogs/iot/using-aws-iot-to-create-a-smart-home-water-monitoring-solution/
Setting up board for AWS IoT
After doing some research into how AWS IoT worked and what it did, I figured out my first task. I wanted to set up my board to connect to AWS IoT over MQTT. The resource I used to navigate this was https://github.com/debsahu/ESP-MQTT-AWS-IoT-Core. The instructions weren’t always totally clear, but it was almost the exact task I needed to do. It also had firmware code examples I could use almost unmodified. I used the PubSubClient library, and just modified the code to only target my ESP8266 hardware platform.
Here’s the basic steps I took:
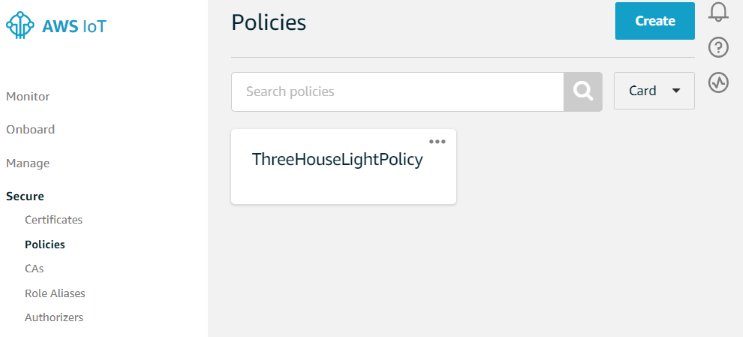
- Create a Policy to give the authenticated board access to the AWS IoT resources. Here’s where it’s found since the instructions on https://github.com/debsahu/ESP-MQTT-AWS-IoT-Core didn’t specify.

- Create a Thing in the AWS IoT to generate the credentials for the board.
- Download the certificates for the board and add them to a secrets header file.
- Add the PubSubClient and ArduinoJSON libraries to the PlatformIO project.
- Copy the https://github.com/debsahu/ESP-MQTT-AWS-IoT-Core/tree/master/Arduino/PubSubClient code into the project configure it for my platform and credentials.
Pretty quickly I was able to see values being read and written to the device by monitoring the serial.
Creating a HTTP API for the board
So now I had AWS as the broker for the MQTT messages coming off the board. I could interact with them directly; any of the clients in https://github.com/hobbyquaker/awesome-mqtt would work. However, I figured the process would be much easier if I had a translation layer between the MQTT and HTTP.
So my goal was to be able to send HTTP commands from a html frontend and have them control the display. To do this I needed a way to map HTTP requests to MQTT messages that would be received by the board. The easiest/cheapest way to implement this on AWS appears to be to use a Lambda function triggered by an API Gateway.
Setting up the lambda function was pretty easy. The Lambda functions just needs to send a message to the AWS iot-data service. I wrote this simple python script for testing:
1
2
3
4
5
6
7
8
9
10
11
12
13
14
15
16
import boto3
import json

client = boto3.client('iot-data', region_name='us-west-1')

def lambda_handler(event, context):
    response = client.publish(
            topic='$aws/things/threehouseslights/shadow/update',
            qos=1,
            payload=json.dumps({"foo":"bar"})
        )
    return {
        'statusCode': 200,
        'body': json.dumps(response)
        }
    }
Adding a dummy test event let me test this and see that I needed to add the IoT access to the role assigned to the lambda function. I needed to go to the Execution role section and click the link to view the rol in the IAM console. Here I added the AWSIoTFullAccess policy. With this done I could see the messages getting recieved by the board when I ran a test.
Setting up the API Gateway was also fairly straightforward. Clicking Add trigger in the Lambda configuration and selecting API Gateway starts a wizard that pretty much handles the whole process. I chose a HTTP API for simplicity. After I clicking the API Gateway in the Lambda configuration gives the endpoint that we’ll be using to control the board. I briefly looked at setting up authentication here, but decided it would be a little complex to manage for now. I decided to use a simple authentication token that would be validated in the Lambda function.
I then could confirm that if I sent an HTTP request to the endpoint (I use the tool Insomnia to manage requests since it’s a little friendlier then cURL).
Creating the connection between the frontend and the API
Now I moved on to making the frontend. Similar to the aproach in Moving to the cloud I made a page that could be passed the auth token by a redirect from the board, or just saved in a bookmark:
1
2
3
4
5
6
7
8
9
10
11
12
13
14
15
16
17
18
19
20
21
22
23
24
25
26
27
28
29
30
31
32
33
34
<!DOCTYPE html>
<html>
<head>
<script src="https://ajax.googleapis.com/ajax/libs/jquery/3.4.1/jquery.min.js"></script>
<script>
$(document).ready(function(){
  var auth_var = "REQUEST_AUTH_TOKEN";
  var url = new URL(window.location.href);
  var auth = url.searchParams.get(auth_var);
  var auth_data = JSON.stringify({REQUEST_AUTH_TOKEN: auth});
  $("button").click(function(){
    $.ajax({
        type: "POST",
        url: "https://apiurl.amazonaws.com/default/IotPubTest",
        // The key needs to match your method's input parameter (case-sensitive).
        data: auth_data,
        contentType: "application/json; charset=utf-8",
        dataType: "json",
        success: function(result){
            $("#div1").html(result);
        },
        failure: function(errMsg) {
            $("#div1").html('error: ' + errMsg);
        }
    });
  });
});
</script>
</head>
<body>
<div id="div1"><h2>Let jQuery AJAX Change This Text</h2></div>
<button>Get External Content</button>
</body>
</html>
and I ran this locally using the simple python server python -m http.server
So far things had been going pretty well. It was complicated and I definetly spent some time debugging snags, but I was making progress. Here I hit a problem that took hours to figure out fully. As you might have noticed, I’m hosting a site in one place and having it make a request to a different domain. This is considered a security issue since it could be abused by a bad actor to perform a sort of man in the middle attack. Therefore browsers attempt to verify that a resource supposed to be accessed from other domains. This is called cross-origin resource sharing (CORS). Mozilla has a pretty good run down https://developer.mozilla.org/en-US/docs/Web/HTTP/CORS.
The API Gateway has an option to enable CORS headers which was nice. But for me, the biggest issue was the fact that the CORS process uses a preflight message to check the HTTP headers before it sends the real message, and it requires it gets back a 200 status response. My function was configured to return an error since the message didn’t have an auth token.
I spent a lot of time messing with the API Gateway and Lambda to try to send the HTTP OPTIONS message to a different lambda, but in the end I just decided to return a 200 if no key is provided and not process it.
With that I accomplished my goal and was ready to program the actual project!